MDI
MDI (Multiple Document Interface) is a Microsoft Windows programming interface for creating an application that enables users to work with multiple documents at the same time..In this the forms are having the relationship as the parent and the child.... Each document is in a separate space with its own controls for scrolling. The user can see and work with different documents such as a spreadsheet, a text document, or a drawing space by simply moving the cursor from one space to another.
An MDI application is something like the Windows desktop interface since both include multiple viewing spaces. However, the MDI viewing spaces are confined to the application's window or client area . Within the client area, each document is displayed within a separate child window . MDI applications can be used for a variety of purposes - for example, working on one document while referring to another document, viewing different presentations of the same information, viewing multiple Web sites at the same time, and any task that requires multiple reference points and work areas at the same time......
To create MDI parent...
To make other form as a MDI child
Dim sh as new CHILD
sh.MDIPARENT= Me
sh.show()
END SUB
An MDI application is something like the Windows desktop interface since both include multiple viewing spaces. However, the MDI viewing spaces are confined to the application's window or client area . Within the client area, each document is displayed within a separate child window . MDI applications can be used for a variety of purposes - for example, working on one document while referring to another document, viewing different presentations of the same information, viewing multiple Web sites at the same time, and any task that requires multiple reference points and work areas at the same time......
To create MDI parent...
- Create Two forms in vb.Net application and Rename To PARENT and CHILD
- Go to PARENT form and Right Click ad select properties...
- From properties windows Just Enable ISMDICONTAINER and set it value to "TRUE"
- You have successfully created a form to work as MDI form....Means it have the capability to open more forms inside MDI form....
To make other form as a MDI child
- Now add a BUTTON tool in PARENT form which is created earlier as MDI form..
- Now Double click button and Code it to :
Dim sh as new CHILD
sh.MDIPARENT= Me
sh.show()
END SUB
- Now run the PARENT FORM and CLICK ON THE BUTTON......
- You will notice that the CHILD form is opened in front of you and it is inside the PARENT FORM....
Q....Tool strip??
ToolStrip is a container for ToolStripItem elements. Each individual element on the ToolStrip is a ToolStripItem that manages the layout and event model for the type it contains. . The ToolStrip controls provide a common interface for Menus and Strips in Windows Forms......ToolStrip control provides functionality of a Windows toolbar controls in Visual Studio...It is menu base collection of tools like button, progress bar, drop down box, combobox etc......
GUI TOOLBOXES...
Textbox: This control looks like a box and accepts input from the user. The TextBox is based on the TextBoxBase class which is based on the Control class. TextBoxes are used to accept input from the user or used to display text. By default we can enter up to 2048 characters in a TextBox but if the Multiline property is set to True we can enter up to 32KB of text...YOu can also make you text as password creator.....To crate a textbox just drap and drop the textbox tool on to the form from the tool box..
Validation only numbers:
if (char.IsLetter(e.keychar)) then
e.handled=true
End if
Validation only character
if (char.IsDigit(e.keychar)) then
e.handled=true
End if
Label: The label is a very useful control for Visual Basic, as it is not only used to provide instructions and guides to the users, it can also be used to display outputs. One of its most important properties is "Text. Using the syntax label.text, it can display text and numeric data . You can change its caption in the properties window and also at runtime.
Button: This control is generally used to execute a set of program code. During the design time, one or more buttons can be placed in the form but each button must be represented by different name....In other words we can say that it generates the output of the coding which is generate when we click on the button.....
Ex:
Private Sub Button1_Click(ByVal sender As System.Object, ByVal e As System.EventArgs) Handles Button1.Click
MessageBox.Show("Button1 was clicked")
End Sub
Listbox: The function of the List Box is to present a list of items where the user can click and select the items from the list. In order to add items to the list, we can use the items.add. For example, if you wish to add a number of items to list box 1, you can code it to :
ex: Public sub load()
listbox1.items.add("HIMANSHU")
listbox1.items.add("DWIVEDI")
end sub
Combobox : A ComboBox control is an items control that works as a ListBox control but only one item from the collection is visible at a time and clicking on the ComboBox makes the collection displayed and allows users to select an item from the collection...A ComboBox control is a combination of three controls - A Button, a Popup, and a TextBox. The Button control is used to show or hide available items and Popup control displays items and let user select one item from the list. The TextBox control then displays the selected item.
Checkbox: CheckBoxes are those controls which gives us an option to select, say, Yes/No or True/False. A checkbox is clicked to select and clicked again to deselect some option. When a checkbox is selected a check (a tick mark) appears indicating a selection....IN this if else condition is used which enables the operation to perform when the checkbox is checked true or false...Give ex
PictureBox: The Picture Box is one of the controls that is used to handle graphics. You can load a picture at design phase by clicking on the picture item in the properties window and select the picture from the selected folder. You can also load the picture at runtime using the images=image.fromfile method. For example, the statement will load the picture grape.gif into the picture box.
Ex: Picture1.image=image.fromfile ("C:\VB program\Images\grape.gif")
Radiobutton : The radio button is also a very useful control in Visual Basic 2010. However, it operates differently from the check boxes. While the checkboxes work independently and allows the user to select one or more items, which means the user can only choose one item only out of a number of choices. Give ex..
Panel: Panels are those controls which contain other controls, for example, a set of radio buttons, checkboxes, etc. Panels are similar to Groupboxes but the difference, Panels cannot display captions where as GroupBoxes can and Panels can have scrollbars where as GroupBoxes can't. .. The default value of the BorderStyle property is set to None. You can select from the predefined list to change a Panels BorderStyle....
Ex: Dim Panel1 As New Panel()
Group box: Groupboxes are used to Group controls. GroupBoxes display a frame around them and also allows to display captions to them which is not possible with the Panel control. The GroupBox class is based on the Control class...Caption is very helps to arrange different tools in group......It is in the form of text written on the top of the box show the the heading ..For example caption show on the group box is STUDENT DETAILS , so it instruct the user to only provide the information about the student...
Draw a diagram...
Scrollbar: The ScrollBar is a commonly used control, which enables the user to select a value by positioning it at the desired location. It represents a set of values. The Min and Max property represents the minimum and maximum value. The value property of the ScrollBar represents its current value, that may be any integer between minimum and maximum values assigned...Two types of scroll are used in VB..they are Hscrollbar and Vscrollbar....Hscrollbas allows user to move from left to right and vscrollbar allows the user to move from up to down...
Ex: We want that when the Hscroll And vscrollbar is clicked the value is displayed in label1 then coding will be...
Timer: The Timer control allows you to set a time interval to execute an event after that interval continuously. It is useful when you want to execute certain applications after a certain interval. Say you want to create a backup of your data processing in every hour. You can make a routine which will take the backup and call that routine on Timer's event and set timer interval for an hour...
Ex: In this we are increasing the value of label1
Dim i as integer 'This should be declare globally
Double click timer
List view: List view is like windows explorer program, that builtin application used for browsing the filesystem ....The four main views that a windows explorer have are List,Details,small icons, and large icons....Windows explorer is the simplest way to learn about the listview....The views in Listview is determined by the value of its property...
Tree view: if you need a hierarchical data in a tree like format in vb.net , you should use Treeview control...This controls allows you to change numerous properties in order to fulfill your needs...IT is the collection of nodes..Which nodes when click perform the coded activities...The best example of tree view is the window explorer which uses a tree like structure at the left pane to display the hierarchy of folders on disk....It provide a collapsing and expanding feature by clicking on the parent node........
To add node
Ex: THis show to add nodes to tree view at runtime......
Toolbar:
The Visual Basic 6.0 ToolBar control is an ActiveX control that is used to create simple toolbars with buttons and combo boxes. You can use the Visual Basic 2005 ToolStrip control to create customized toolbars and user-interface elements or to create toolbars and user-interface elements that have the appearance and behavior of Microsoft Windows XP,.Toolstrip contain a collection of tools like button, label, dropdownbutton, combobox , progressbar etc...
To add new toolbar(vb 6.0) :
Status strip: StatusStrip control is a powerful StatusBar control that displays information about an object being viewed on a form, the object component....It also contain ProgressBar, DropdownButton, SplitButton, and Label features, you can add a progress bar, a drop down button, a SplitButton, or a label control to the StatusStrip itself.....
Validation only numbers:
if (char.IsLetter(e.keychar)) then
e.handled=true
End if
Validation only character
if (char.IsDigit(e.keychar)) then
e.handled=true
End if
Label: The label is a very useful control for Visual Basic, as it is not only used to provide instructions and guides to the users, it can also be used to display outputs. One of its most important properties is "Text. Using the syntax label.text, it can display text and numeric data . You can change its caption in the properties window and also at runtime.
Button: This control is generally used to execute a set of program code. During the design time, one or more buttons can be placed in the form but each button must be represented by different name....In other words we can say that it generates the output of the coding which is generate when we click on the button.....
Ex:
Private Sub Button1_Click(ByVal sender As System.Object, ByVal e As System.EventArgs) Handles Button1.Click
MessageBox.Show("Button1 was clicked")
End Sub
Listbox: The function of the List Box is to present a list of items where the user can click and select the items from the list. In order to add items to the list, we can use the items.add. For example, if you wish to add a number of items to list box 1, you can code it to :
ex: Public sub load()
listbox1.items.add("HIMANSHU")
listbox1.items.add("DWIVEDI")
end sub
Combobox : A ComboBox control is an items control that works as a ListBox control but only one item from the collection is visible at a time and clicking on the ComboBox makes the collection displayed and allows users to select an item from the collection...A ComboBox control is a combination of three controls - A Button, a Popup, and a TextBox. The Button control is used to show or hide available items and Popup control displays items and let user select one item from the list. The TextBox control then displays the selected item.
Checkbox: CheckBoxes are those controls which gives us an option to select, say, Yes/No or True/False. A checkbox is clicked to select and clicked again to deselect some option. When a checkbox is selected a check (a tick mark) appears indicating a selection....IN this if else condition is used which enables the operation to perform when the checkbox is checked true or false...Give ex
PictureBox: The Picture Box is one of the controls that is used to handle graphics. You can load a picture at design phase by clicking on the picture item in the properties window and select the picture from the selected folder. You can also load the picture at runtime using the images=image.fromfile method. For example, the statement will load the picture grape.gif into the picture box.
Ex: Picture1.image=image.fromfile ("C:\VB program\Images\grape.gif")
Radiobutton : The radio button is also a very useful control in Visual Basic 2010. However, it operates differently from the check boxes. While the checkboxes work independently and allows the user to select one or more items, which means the user can only choose one item only out of a number of choices. Give ex..
Panel: Panels are those controls which contain other controls, for example, a set of radio buttons, checkboxes, etc. Panels are similar to Groupboxes but the difference, Panels cannot display captions where as GroupBoxes can and Panels can have scrollbars where as GroupBoxes can't. .. The default value of the BorderStyle property is set to None. You can select from the predefined list to change a Panels BorderStyle....
Ex: Dim Panel1 As New Panel()
- Dim CheckBox1 As New CheckBox()
- Panel1.Location = New Point(30, 60)
- Panel1.Size = New Size(200, 264)
- Me.Controls.Add(Panel1)
- CheckBox1.Size = New Size(95, 45)
- CheckBox1.Location = New Point(20, 30)
- Panel1.Controls.Add(CheckBox1)
Group box: Groupboxes are used to Group controls. GroupBoxes display a frame around them and also allows to display captions to them which is not possible with the Panel control. The GroupBox class is based on the Control class...Caption is very helps to arrange different tools in group......It is in the form of text written on the top of the box show the the heading ..For example caption show on the group box is STUDENT DETAILS , so it instruct the user to only provide the information about the student...
Draw a diagram...
Scrollbar: The ScrollBar is a commonly used control, which enables the user to select a value by positioning it at the desired location. It represents a set of values. The Min and Max property represents the minimum and maximum value. The value property of the ScrollBar represents its current value, that may be any integer between minimum and maximum values assigned...Two types of scroll are used in VB..they are Hscrollbar and Vscrollbar....Hscrollbas allows user to move from left to right and vscrollbar allows the user to move from up to down...
Ex: We want that when the Hscroll And vscrollbar is clicked the value is displayed in label1 then coding will be...
- public sub him()
- hscrollbar1.Max=20
- hscrollbar1.min=0
- vscrollbar1.Max=20
- vscrollbar1.min=0
- label1.Text=hscrollbar1.value
- label2.Text=vscrollbar1.value
Timer: The Timer control allows you to set a time interval to execute an event after that interval continuously. It is useful when you want to execute certain applications after a certain interval. Say you want to create a backup of your data processing in every hour. You can make a routine which will take the backup and call that routine on Timer's event and set timer interval for an hour...
Ex: In this we are increasing the value of label1
Dim i as integer 'This should be declare globally
Double click timer
- Private Sub Timer1_Tick
- i = i + 1
- ProgressBar1.Value = i
- If ProgressBar1.Value = ProgressBar1.Maximum Then
- Timer1.Stop()
- i = 0
- Timer1.Start()
- End If
- END SUB
List view: List view is like windows explorer program, that builtin application used for browsing the filesystem ....The four main views that a windows explorer have are List,Details,small icons, and large icons....Windows explorer is the simplest way to learn about the listview....The views in Listview is determined by the value of its property...
- List= Each items appear as small icon with label to its right..In this items are arranged in columns with no column head..
- Details: Each items appears on separate line with further information about each items arranged in column...A column displays a header which can display a caption for the column....
- Smallicon: Each items appears as a small icon with a label to its right....
- Large icon: ach items appears as a Full sized icon with a label below it....
Tree view: if you need a hierarchical data in a tree like format in vb.net , you should use Treeview control...This controls allows you to change numerous properties in order to fulfill your needs...IT is the collection of nodes..Which nodes when click perform the coded activities...The best example of tree view is the window explorer which uses a tree like structure at the left pane to display the hierarchy of folders on disk....It provide a collapsing and expanding feature by clicking on the parent node........
To add node
- Drag and drop tree view from the toolbox ...
- adjust the size of you tree view according to your need...
- Now right click on the "Tree view " and select properties..
- Now click on nodes in the properties window..
- Now click "Add root" it will automatically create node with name "NODE0"
- NOW you want to add the child node to "NODE0" ..Click "Add CHILD" It will automatically add the chile note with name "NODE1"
- Now run the form...You will notice that you will get the Tree view with Two nodes....NODE0 and NODE1....
- When you expand the NODE0 , you will see the child node...
Ex: THis show to add nodes to tree view at runtime......
- Double click form
- tree()
- end sub
- public sub tree()
- treeview.nodes.add("c++")
- treeview.nodes.add("VB.NET")
- endsub
Toolbar:
The Visual Basic 6.0 ToolBar control is an ActiveX control that is used to create simple toolbars with buttons and combo boxes. You can use the Visual Basic 2005 ToolStrip control to create customized toolbars and user-interface elements or to create toolbars and user-interface elements that have the appearance and behavior of Microsoft Windows XP,.Toolstrip contain a collection of tools like button, label, dropdownbutton, combobox , progressbar etc...
To add new toolbar(vb 6.0) :
- To add toolbar to the top of you form expand the toolbox and locate the toolbar control....
- Double click the toolbar control and it will be added to the top of your form..
- Toolbar work by adding button and images to it...Click on you toolbar to select it...This brings up the ToolbarButton collection editor.
- To add new button click add button...
- Each button has its own property .you can change according to you needs...
- After adding button click ok ...You have successfully created a toolbar which can perform any operation...
Status strip: StatusStrip control is a powerful StatusBar control that displays information about an object being viewed on a form, the object component....It also contain ProgressBar, DropdownButton, SplitButton, and Label features, you can add a progress bar, a drop down button, a SplitButton, or a label control to the StatusStrip itself.....
Dialog boxes???
Most Windows applications request for user input. Dialog boxes are one means of requesting users for specific kinds of inputs. Therefore, VB.NET allows its designers to create a number of different types of dialog boxes...Types of dialog boxes are :
Example:
SaveFileDialog: The SaveFileDialog class offers you the standard window that we see while saving the file. The methods and properties of this dialog box are given below:
Following code enables you to save the text to a particular file with the help of using rich text box...
Font Dialog: A FontDialog control is used to select a font from available fonts installed on a system. A typical Font Dialog looks like box where you can see there is a list of fonts, styles, size and other options. Please note a FontDialog may have different fonts on different system depending on what fonts are install on a system....
Example:
public sub him()
FontDialog1.ShowColor = True
FontDialog1.Font = TextBox1.Font
FontDialog1.ShowDialog()
TextBox1.Font = FontDialog1.Font
end sub
The following code just want you to enter some text in textbox....When you entered click on the button ..you will see a font dialog , from there you select the font or size of the font..The result of the text in the textbox can be seen....
Color Dialog: The Windows Forms ColorDialog component is a pre-configured dialog box that allows the user to select a color from a palette and to add custom colors to that palette. It is the same dialog box that you see in other Windows applications to select colors. Use it within your Windows application as a simple solution in place of configuring your own dialog box. .
Example:
Public sub color()
ColorDialog1.ShowDialog()
TextBox1.ForeColor = ColorDialog1.Color
end sub.......
Print Dialog: A PrintDialog control is used to open the Windows Print Dialog and let user select the printer, set printer and paper properties and print a file. A typical Open File Dialog looks like Figure 1 where you select a printer from available printers, set printer properties, set print range, number of pages and copies and so on. Clicking on OK button sends the document to the printer.
Create print dialog at runtime:
Creating a PrintDialog control at run-time is simple. First step is to create an instance of PrintDialog class and then call the ShowDialog method. The following code snippet creates a PrintDialog control.
Dim PrintDialog1 As New PrintDialog()
PrintDialog1.ShowDialog()
Example:
Imports System.Drawing.Printing
Public sub printf()
- FileDialog
- ColorDialog
- FontDialog
- PageSetupDialot
- PrintDialog
- ShowDialog=Displays the dialog
- MultiSelect= Sets/unsets the selection of multiple files
- ShowReadOnly=Sets/unsets the read-only check box checked
- Filter= Sets the type of files that will appear in the dialog box
Example:
- OpenFileDialog1.Filter = "{*.BMP) | *.*"
- PictureBox1.SizeMode = PictureBoxSizeMode.StretchImage
- OpenFileDialog1.InitialDirectory = "C:\"
- If OpenFileDialog1.ShowDialog = Windows.Forms.DialogResult.OK Then
- PictureBox1.Image = Image.FromFile(OpenFileDialog1.FileName)
- End If
SaveFileDialog: The SaveFileDialog class offers you the standard window that we see while saving the file. The methods and properties of this dialog box are given below:
- ShowDialog=Displays the message
- CheckFileExists=Checks for the existence of file specified
- FileName=Determines the file name selected by the user
- Filter= Condition for files to be shown in the dialog box
- SaveFileDialog1.Filter = "(*.txt)| *.*"
- SaveFileDialog1.InitialDirectory = "D:"
- If (SaveFileDialog1.ShowDialog() = DialogResult.OK) Then
- RichTextBox1.SaveFile(SaveFileDialog1.FileName, RichTextBoxStreamType.PlainText)
- MessageBox.Show("file saved")
- RichTextBox1.Text = ""
- End If
Following code enables you to save the text to a particular file with the help of using rich text box...
Font Dialog: A FontDialog control is used to select a font from available fonts installed on a system. A typical Font Dialog looks like box where you can see there is a list of fonts, styles, size and other options. Please note a FontDialog may have different fonts on different system depending on what fonts are install on a system....
Example:
public sub him()
FontDialog1.ShowColor = True
FontDialog1.Font = TextBox1.Font
FontDialog1.ShowDialog()
TextBox1.Font = FontDialog1.Font
end sub
The following code just want you to enter some text in textbox....When you entered click on the button ..you will see a font dialog , from there you select the font or size of the font..The result of the text in the textbox can be seen....
Color Dialog: The Windows Forms ColorDialog component is a pre-configured dialog box that allows the user to select a color from a palette and to add custom colors to that palette. It is the same dialog box that you see in other Windows applications to select colors. Use it within your Windows application as a simple solution in place of configuring your own dialog box. .
Example:
Public sub color()
ColorDialog1.ShowDialog()
TextBox1.ForeColor = ColorDialog1.Color
end sub.......
Print Dialog: A PrintDialog control is used to open the Windows Print Dialog and let user select the printer, set printer and paper properties and print a file. A typical Open File Dialog looks like Figure 1 where you select a printer from available printers, set printer properties, set print range, number of pages and copies and so on. Clicking on OK button sends the document to the printer.
Create print dialog at runtime:
Creating a PrintDialog control at run-time is simple. First step is to create an instance of PrintDialog class and then call the ShowDialog method. The following code snippet creates a PrintDialog control.
Dim PrintDialog1 As New PrintDialog()
PrintDialog1.ShowDialog()
Example:
Imports System.Drawing.Printing
Public sub printf()
- Dim printDlg As New PrintDialog()
- Dim printDoc As New PrintDocument()
- printDoc.DocumentName = "Print Document"
- printDlg.Document = printDoc
- printDlg.AllowSelection = True
- printDlg.AllowSomePages = True
- If (printDlg.ShowDialog() = DialogResult.OK) Then
- printDoc.Print()
- End If
Menus..
Menu bar is the standard feature of most windows applications. The main purpose of the menus is for easy navigation and control of an application. Some of the most common menu items are File, Edit, View, Tools, Help and more. Each item on the main menu bar also provide a list of options....Menu provide can improve the ease of using your program by the user, and not to confuse the user with unnecessary items....Some items of menu are file, edit, view, insert, format, tools, tables,windows,help etc....
Context menu: Context menu also represent a shortcut to different action in an application, they are accessed by right click of the mouse...In an application context menu vary depending on which control the right click is done...
Creating menus :
Context menu: Context menu also represent a shortcut to different action in an application, they are accessed by right click of the mouse...In an application context menu vary depending on which control the right click is done...
Creating menus :
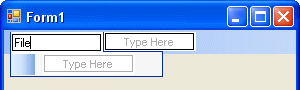
- Open the form. Drag and drop menustrip control from the tool box into the form. The form tray, a special area in the bottom of the form displays the name of the menustrip control as MenuStrip1.
- Click on the command typehere and type as &File. The & symbol means that F is the access key. As soon as start typing , two more words TypeHere appears one is in the same level and another one is below the File command.
- Enter New, &Open, &Save and &Exit options below the File menu.
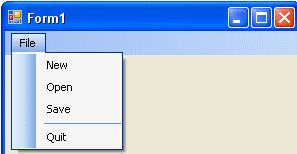
- To write code that will be executed whenever a menu item is clicked, double click on the menu item and add the code of a particular event...
- Now you are ready......Click anywhere on the form and run the application. The menu will appear....As shown in figure....
| menuitem.gif |
| menu.jpg |
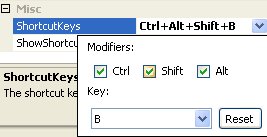
To add short cut keys to the menu items: Suppose take an example that we want a key ctrl + O key when pressed together the file menu open ...So it can be done very easily ....Follow the steps:
- Click on file menu...and right click and select properties
- The properties windows appear at right side of desktop...In properties windows select SHOURTCUTKEYS option...
- Then select the modifier as CTRL and the keys as O......As show in figure..
- IF you want that the short cut key should view on along with the menu item...change the property of SHOWSHORTCUTKEY and set it to true......
- No debug the program ..and press ctls + O key..you will notice that you get the open dialog box...
| short.jpg |
